#1 How I built my 1st website & prevented my housemate hacking into it... again

“Hello world” Now with that IT pun out the way, let me share to you my experience and method to how I built my 1st website (this very one) to start my own blogging series - well technically this is my 2nd ever website, but you’ll find out why later on.
As will many IT geeks out there, you will make mistakes along the way whether you’re a noob or a skilled keyboard warrior, the trick is learning from them. This was the case with me when within a minute of my website going live it was hacked by my housemate, defaced, and an unhappy Ash having to purge his website and start the process of building up a new website - That’s one way to learn new things!
To do:
a. Find a suitable CMS (Content Management System) to create a blog site (WordPress vs DigitalPress ghost blog vs LinkedIn)
b. Acquire a domain name
c. DNS configuration
d. Securing DNS
a. Finding a Suitable CMS (Content Management System)
Since I knew I wanted to start blogging, I looked for a CMS tailored for the purpose of blogs. The top 3 that jumped out to me were: LinkedIn, WordPress and DigitalPress. In the end I chose DigitalPress, due to it not requiring a steep learning curve to understand, allowing me more time to focus on blog creation rather than website configuration, requires no server management and is free (my favourite word)! Additionally, I find that LinkedIn is flooded with content with it being hard to maintain a repository of blogs and it can be hard work maintaining the presence of articles in amongst the sea of content within everyone's newsfeeds.
Check out https://www.digitalpress.blog/ if you’d like to try it out for yourself.
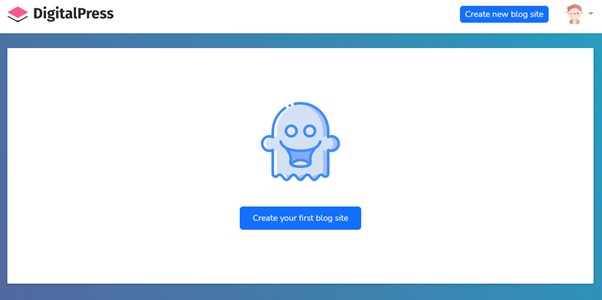
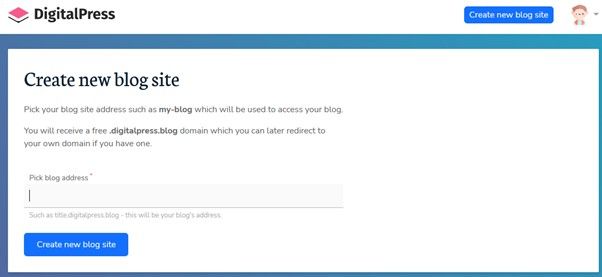
To create your blog site takes minutes and is easy to do. Signup for a DigitalPress account, click “Create your first blog site”, and create a blog site address. At this point you could stop here and start building out your blog site, but because I want my own domain not the free ‘.digital press.blog’ domain, then don’t worry about what the blog site address is at this stage, as this will be changed later once we create our own domain.
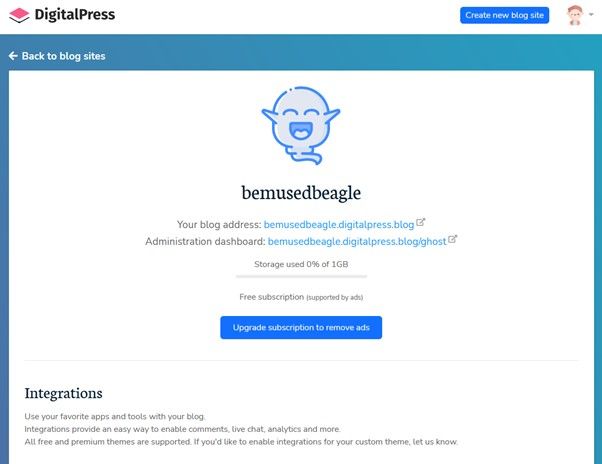
Once you’ve created your new blog site, you’ll have 2 URLs. The 1st is your blog site address that’s publicly accessible the 2nd is your admin login portal to modify your site. Keep this 2nd link safe, as the 1st time you use this link, you’ll be prompted to create a username and password for the admin account for your site.
b. Acquiring a Domain
I wanted to make it easy for people to visit my blog site, therefore I wanted to register a domain. To experience the “joys” of acquiring a domain, first pick a domain that no one has used/taken before and sounds kinda catchy or cool (last bit not required though). You can search and buy domains from domain registration providers. I use 123-reg, but there are plenty to choose from (including GoDaddy, NameCheap, etc).
A domain is a unique name, that is human readable, that identifies a specific website. A website has an associated IP address, used to identify it and correlates to a domain. For example, if you visit cloudflare.com, you would also visit it using the IP address of 1.1.1.1
Check out this YouTube video by Linus who explains it a lot better than I could.
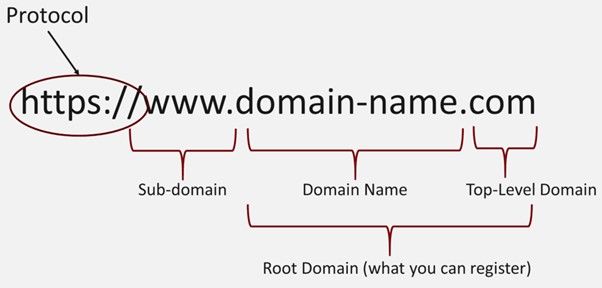
I wouldn’t have guessed that it would take me north of 1 hour to successfully come up with a “cool” domain and for it to not have been take, but that’s the price you pay for not being a creative individual. Personally tip, aim for .com top-level domain, as I find it to be the most universal one (compared to .org, co.uk, .co, etc). Because I’m cheap, I only bought the .com domain, but if you want to (and if they’re available) you can buy a bundle of top-level domains, but be cautious, after 1yr you will have to renew your domain/s to avoid them from expiring. Also, you tend to get large discounts from 123-reg if you’re a new customer. For example, I saved over £13. Also don’t panic if you don’t see your domain as soon as you’ve purchased it, like mine it may take 5-10minutes before it appears on your domain registration provider account.
c. DNS configuration
Once you’ve purchased your domain you will need to then activate your custom domain within your CMS, in this case our digital press site.
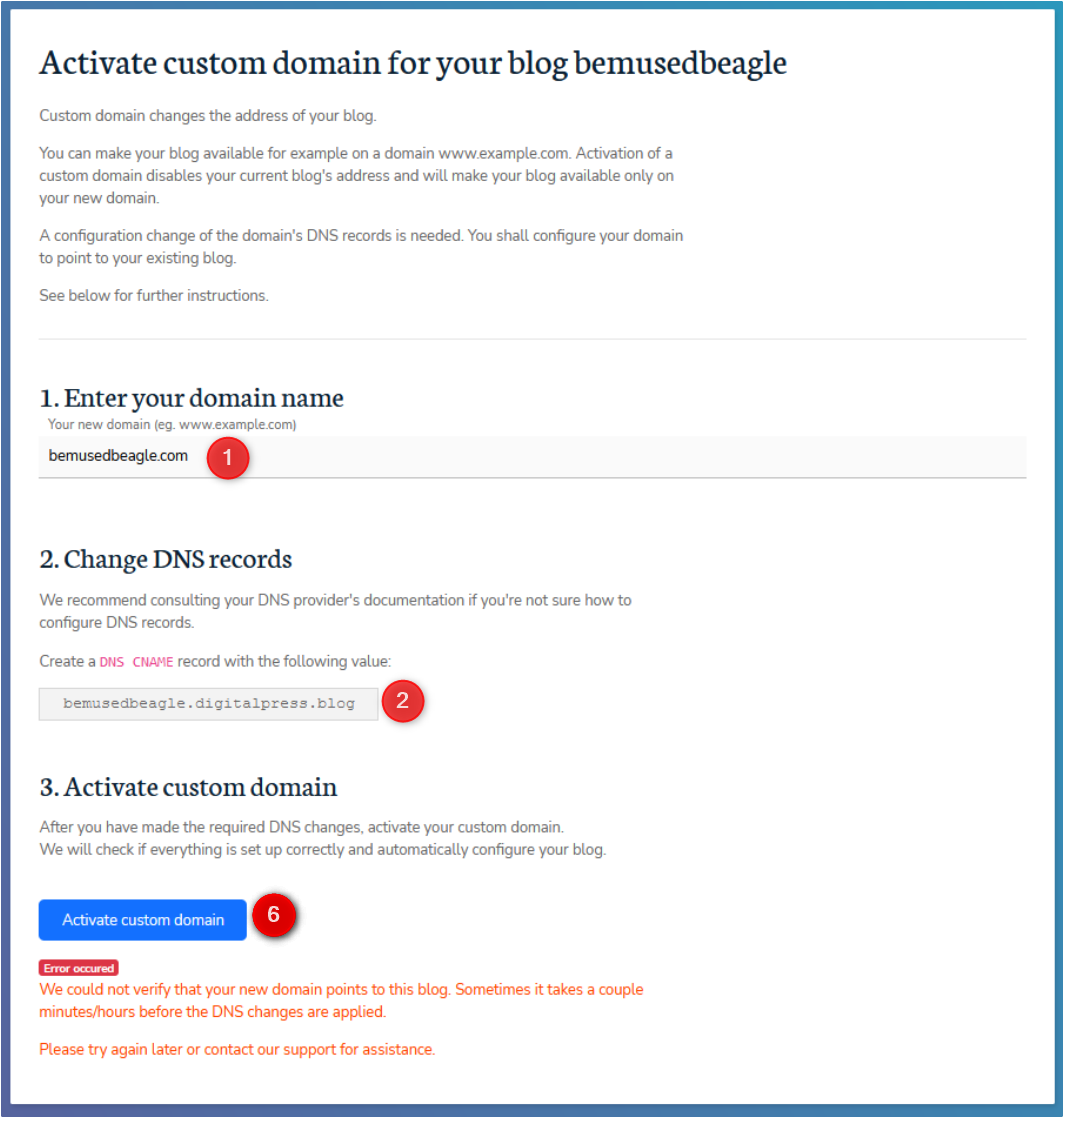
- Enter the domain name you’ve purchased.
- Next you need to change your DNS records by creating a DNS CNAME record with the value the CMS has provided you. To do this copy the value of the site
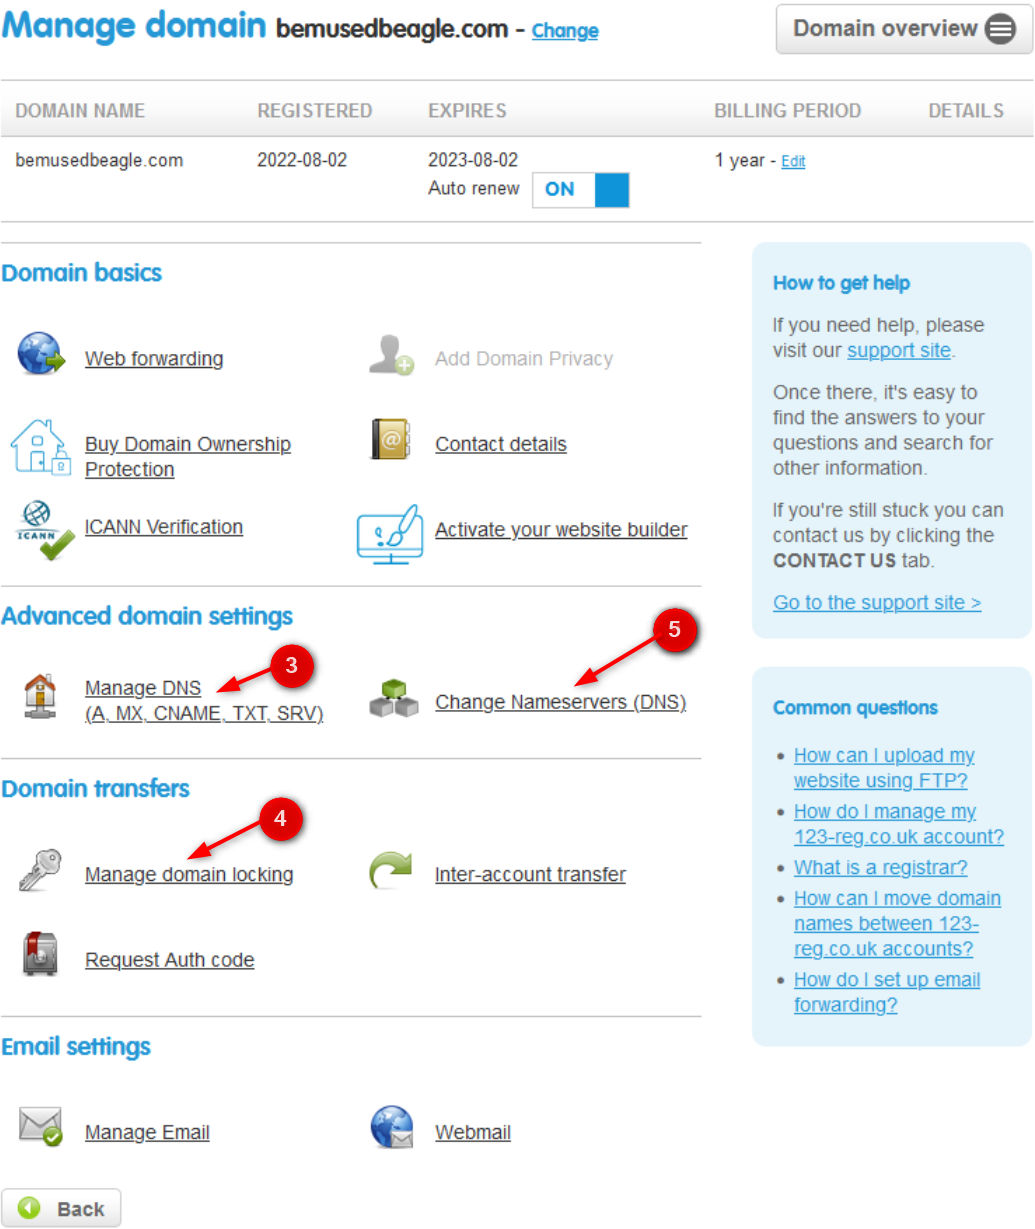
3. Within your domain registration provider account, in our case 123-reg, navigate to “manage DNS (A, MX, CNAME,TXT, SRV)” and then select advanced domain settings.
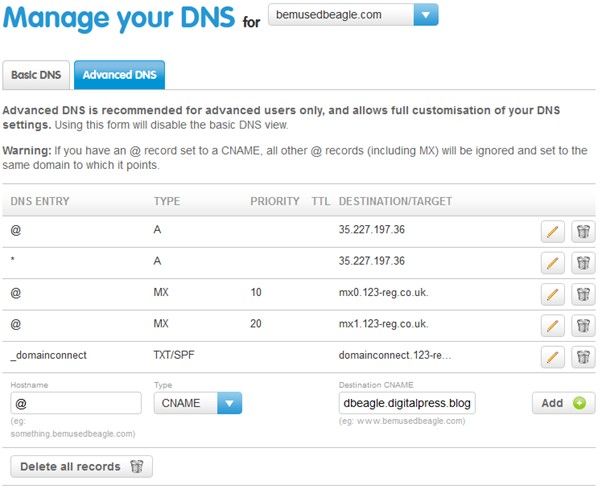
a. Within the advanced DNS tab you can modify the DNS search. Typically, you would enter a DNS record by entering the Hostname typically’@‘ (this symbol acts as a wildcard, meaning it can take any value), select CNAME in the DNS type and enter the destination/target of your site, i.e. the value in step 2. Using this method, we can have a user type “bemusedbeagle.com”, without the need for www. at the beginning and removing the need for users to need to type our domain name with the DigitalPress address. Things get “interesting”, however, as ‘@’ is no longer supported by 123-reg for CNAME DNS types. Instead ‘www.’ is required for the hostname within the DNS entry column instead. See 123-reg site for more details of this. I did try multiple ways to get 123-reg to accept ‘@’ as the hostname to no success. - You can skip this step if, like me, you are going to be faced with this same issue.
We’re IT people, and we don’t given up so easily, so rather than to accept this, I turned to Cloudflare. “What’s Cloudflare” I hear you ask? The basics of Cloudflare is to enhance the security and performance of a website. Its main popularity with users is its DDoS (Distributed Denial of Service) mitigation service. However, I’m leveraging Cloudflare for its free functionality of DNS management, since 123-reg is unable to provide me.
4. Before moving to Cloudflare, I navigated to “manage domain locking”, within the domain transfer section of my 123-reg account and made sure it was selected as NOT locked, as I would later need to replace the name servers that 123-reg predefined with Cloudflare’s defined name servers later on. You may have a warning message pop up, saying something like your domain is at risk (or something similar). Do not panic, as again we need to ensure the domain is unlocked to be able to proceed in using Cloudflare. I felt like 123-reg was scaremongering users with these kind of messages to force them to keep their domain locked to 123-reg, something personally I do not like!
Once I created my Cloudflare account I selected “review your DNS records” and added the new DNS entry with type as “CNAME”, Name as your domain name and the content pointing to the value that DigitalPress provided me. I deselected the proxy status to ensure it was DNS resolution only, as it appeared DigitalPress had its own SSL certificate for the site, so didn’t want to risk adding another layer of encryption that may cause me issues later down the line.
5. Cloudflare provides 2 nameservers which have to be updated on your 123-reg (or equivalent) account. The role of a nameserver is to help direct internet/network traffic.
It’s likely it’ll about an hour for Cloudflare to validate the new DNS record you’ve created.

6. Once you’ve updated the nameservers that Cloudflare has given you on your domain registration account and your DNS record has been validated in Cloudflare, click “Activate Custom Domain” on your digital press site. You may received an error like I did whereby you may have to wait a further hour or so when your domain record was validated from Cloudflare. Don’t worry, try again every hour or so until it is successful, as it may take some time for digital press to receive the changes to your DNS configuration.
e. Ways to secure your DNS
There are 3 ways to secure your DNS immediately with Cloudflare.
1.Change your proxy status to on, to encrypt traffic. DigitalPress already does this, so there’s no need if you’re already using this CMS.
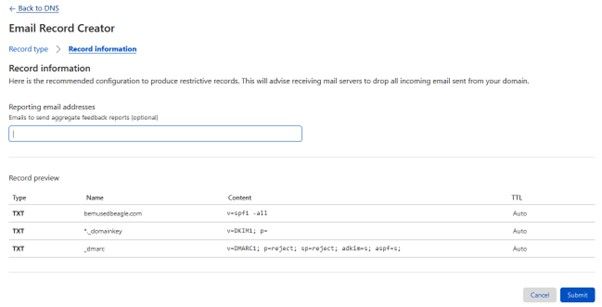
2. Create an email record to help verify to users that the site they’re accessing is indeed your site and to stop attackers spoofing emails using your domain. Email spoofing is a form of phishing where an attacker impersonates their target (business or individual) with a fake website or email address to fool people into trusting them.
Though this does not directly prevent domains like mine from being spoofed, it can enhance the verification of sites, using security enhancements such as:
SPF - Lists authorised IP addresses and domains that can send emails on behalf of your domain.
DKIM (DomainKeys Identified Mail) - Uses a digital signature based on public key cryptography, allowing senders to generate a pair of keys which can be used to “sign” emails - Think of it when paying using a credit card and the cashier checks your signature on both the receipt and back of the card, to confirm it’s really yours.
DMARC (Domain-based Message Authentication, Reporting and Conformance) - Uses both SPF and DKIM to detect and help protect email senders and receivers from spoofed emails and spam.
Because I don’t intend for my domain to be used to send emails to my audience, within the Cloudflare site I’ve used their recommended configuration to produce restrictive records, advising mail servers to drop all incoming emails sent from my domain.
3. Most importantly, before creating and hosting your domain setup your user account details in the administrator console, when first selecting and creating your site in the CMS. Failure to do so could resolution in someone hijacking your account. This is possible due to someone knowing the URL for creating a DigitalPress account and seeing any new domains recently created and trying to access the URL to create the admin account before you do, whilst you spend your time creating your custom domain for the site. Don’t think this is possible, well hackers do exist, and it may be someone closer than you think. Take for example my housemate, who knew that I bought a domain and who suggest DigitalPress as a potential CMS to create my blog site whilst I was explaining to him that I bought a new domain. Whilst I was setting up my custom domain to link to my DigitalPress account, he was able to access the admin console to create an account before I could. This resulted in having to repeat the process of deleting the blog on the CMS site, creating a new one and going through the process deleting the DNS record in Cloudflare and again creating that DNS record.

